Knowing how to cut tile around a door frame is simpler than most people think — and you don't need a contractor to get it right. Measure the tile against the frame, mark your cut lines, use a wet saw or oscillating tool, and fit the tile snugly into place. This guide breaks the process into 7 clear steps, covers the tools you need, common pitfalls, and how to keep the results looking sharp for years. If your renovation also involves door changes, read our guide on how to replace a front door before you set a single tile — sequencing matters.
Door frames are one of the trickiest obstacles in any tile installation. The casing sits lower than the finished floor once tile and mortar are in place, which means you often need to undercut the frame and slide tile beneath it — or cut a precise notch that wraps tightly around the casing profile. Either way, precision matters. A gap even a few millimeters too wide looks sloppy and traps moisture over time.
The good news is that with the right tools and a clear process, you can get a professional result on your first attempt. Whether you're tiling a bathroom threshold, a hallway entry, or a mudroom doorway, the technique is the same.
Contents
- Planning Your Approach Before You Cut a Single Tile
- How to Cut Tile Around a Door Frame: 7 Steps
- DIY vs. Hiring a Pro: Weighing Your Options
- 5 Myths About Cutting Tile Around Door Frames — Busted
- Troubleshooting Common Tile-Cutting Problems
- Keeping Your Tile Edges Looking Clean Long-Term
- Frequently Asked Questions
- Final Thoughts
Planning Your Approach Before You Cut a Single Tile
Before you touch a tile, you need a solid plan. Rushing into cuts without preparation is the number one cause of wasted tile and misaligned edges. Spend 20–30 minutes in the planning phase and you'll save hours of rework later.
Tools and Materials You Need
Gather everything before you start. Mid-project supply runs break your focus and create mistakes. Here's your complete list:
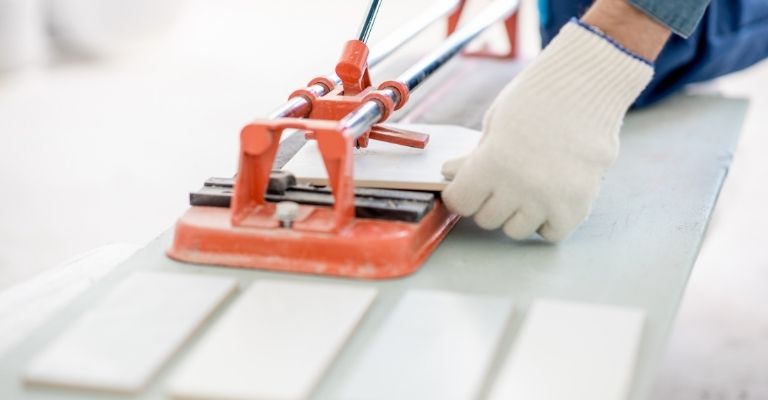
- Wet tile saw — the most precise tool for straight and notched cuts; produces clean edges with minimal chipping
- Angle grinder with a diamond blade — great for curved profiles and tight notch work
- Oscillating multi-tool — essential for undercutting door casings cleanly and safely
- Tile scribe or marking pencil
- Tape measure and combination square
- Safety glasses, ear protection, and a dust mask rated for silica dust
- Notched trowel and grout float
- Tile spacers
- Thin-set mortar and unsanded or sanded grout (depending on joint width)
- Flexible caulk in a color matching your grout, for the transition joint
For a solid overview of tile materials and their properties, Wikipedia's ceramic tile article is a useful reference before you shop for materials.
Measuring Right the First Time
Accurate measurement is the difference between a tile that fits and one that gets thrown in the trash. Here's how to do it without guessing:
- Lay a full tile flat on the floor in its exact target position against the door casing.
- Hold a pencil flush against the casing and trace the profile directly onto the tile surface.
- Use a combination square to confirm any lines that should be perfectly perpendicular.
- Mark a second reference line 1–2 mm inside your traced line — tile doesn't flex, so you need that clearance.
- Double-check the measurement by holding the marked tile against the frame before you cut anything.
If your project also involves understanding door clearances — for instance, when you're planning a threshold transition — our guide on how to measure a front door covers the exact dimensions you'll need to account for.
Pro tip: Always cut 1–2 mm smaller than your traced line. A cut that's precisely on the line often won't slide into place — and forcing a tight tile risks cracking it.
How to Cut Tile Around a Door Frame: 7 Steps
Here is the complete method. Follow these in order. This is the core of how to cut tile around a door frame — skipping a step is what causes most problems.
Steps 1–2: Undercut the Frame and Dry-Fit
Step 1 — Undercut the door casing. Use an oscillating multi-tool to remove the bottom of the door casing so the tile can slide underneath it. Stack a tile on the subfloor with a piece of cardboard on top (the cardboard simulates the thin-set thickness) and use that surface as your saw guide. Slide the tool's blade along the cardboard top and cut through the casing at exactly the right height. This gives you a clean, invisible transition rather than a visible notch butting up against the casing face.
Step 2 — Dry-fit the tile. Before any mortar goes down, slide the tile into position without adhesive. It should slide under the casing and sit flush with adjacent tiles. If it binds, remove more material from the casing. If there's a visible gap above the tile, your undercut was too high — though this is rare when you use the tile-plus-cardboard guide method.
Steps 3–7: Mark, Cut, and Install
Step 3 — Mark the notch cut (if undercutting isn't possible). For tiles that need a notch cut to wrap around the casing profile, place the tile in its target position and trace the casing outline directly onto the tile face. Use your combination square to check that lines meant to be straight are actually straight.
Step 4 — Make the cuts. Use the wet saw for straight lines. Cut along one line, rotate the tile, cut along the second. For the inside corner of the notch, score deeply with the wet saw and snap, or finish the corner with an angle grinder. Go slowly — fast cuts generate heat and cause chipping.
Step 5 — Dry-fit the cut tile. Always test the fit before mortar. Check that the cut tile sits flush with adjacent tiles on all sides, that the notched edge fits snugly against the casing, and that grout joint widths are consistent.
Step 6 — Set the tile in thin-set. Spread thin-set mortar with a notched trowel, holding it at a 45-degree angle to create even ridges. Press the tile firmly with a slight twisting motion to collapse those ridges and maximize contact. Place tile spacers to maintain consistent grout joints.
Step 7 — Grout and caulk. After the mortar cures fully (at least 24 hours), apply grout to all joints using a grout float. At the joint where tile meets door casing, use flexible caulk instead of grout. Door frames move slightly with seasonal humidity changes — grout will crack at that joint within months. Caulk flexes with that movement without failing.

DIY vs. Hiring a Pro: Weighing Your Options
Not every tile project is the right call for a DIY approach. Here's an honest breakdown of what you can handle on your own and when it's worth paying someone else to take over.
When DIY Makes Sense
Handle this yourself if:
- You're tiling a single doorway or small entryway — not a full room requiring layout planning
- You have access to a wet saw (hardware store rentals typically run around $50 per day)
- The tile material is standard ceramic or porcelain — not natural stone
- The subfloor is flat and in good condition with no leveling needed
- The door casing has a simple, straight profile — no ornate curves
When to Call a Professional
Bring in a pro if any of these apply:
- You're working with large-format tiles (24"×24" or bigger) — these are heavy, unforgiving, and hard to cut cleanly without experience
- The door casing has decorative curves that require freehand grinding
- The subfloor needs leveling compound or waterproofing before any tile goes down
- You're tiling an entire room, not just the threshold area
- The tile material is natural stone, which requires specialized blades, sealing, and handling
| Factor | DIY | Professional |
|---|---|---|
| Cost | Low — tool rental plus materials | Higher — labor plus materials |
| Time investment | Half-day to full day | 2–4 hours (experienced crew) |
| Skill required | Basic measuring and cutting | None required from you |
| Best tile type | Ceramic, standard porcelain | Natural stone, large-format |
| Risk of mistakes | Moderate — recoverable with care | Very low |
| Result quality | Good to excellent with patience | Consistently excellent |
5 Myths About Cutting Tile Around Door Frames — Busted
There's a lot of bad advice floating around about tile cutting. Here are the myths that trip up most first-timers — and the truth behind each one.
Myths About Tools
- Myth: "A regular circular saw will do the job." A dry circular saw will shatter porcelain and create dangerous airborne shards. You need a diamond blade — either on a wet saw (ideal) or an angle grinder (acceptable). The water on a wet saw cools the blade and suppresses silica dust.
- Myth: "A snap cutter is good enough for notch cuts." Snap cutters make full-width straight cuts only. The L-shaped or irregular notch cuts required at a door frame require a wet saw or angle grinder. A snap cutter will crack the tile the moment you try a corner cut.
- Myth: "You don't need safety gear for a quick cut." Tile shards travel at high speed. Diamond blades generate ceramic dust containing crystalline silica — a confirmed cause of silicosis, a serious and irreversible lung disease. Wear safety glasses and a properly rated dust mask every time, without exception.
Myths About Technique
- Myth: "Grout works fine at the casing joint." Grout is rigid. Door frames expand and contract with seasonal humidity. That joint will crack within months if you fill it with grout. Always use flexible, paintable caulk at any joint between tile and a fixed structure like a door casing or wall.
- Myth: "You can caulk over a large gap if the cut comes out too wide." Caulk is a sealant, not a structural filler. A wide gap packed with caulk looks amateur and won't hold over time. If your cut is too wide by more than 3mm, recut a new tile — there's no clean fix for a large gap.
Warning: Never skip the dry-fit step. Setting a tile in mortar before confirming it fits correctly wastes an expensive tile — mortar begins setting within 15–30 minutes and pulling a mis-set tile almost always cracks it.
Troubleshooting Common Tile-Cutting Problems
Even careful tilers run into issues. Here's how to diagnose and fix the most common problems that come up when you're cutting tile around a door frame.
Gaps, Chips, and Uneven Edges
- Chipped cut edge: Almost always caused by cutting too fast or using a dull diamond blade. Slow your feed rate and replace blades regularly — a worn blade generates friction heat and causes micro-fractures in the tile edge before the cut even completes.
- Gap between tile and casing is under 3mm: Fill it with color-matched flexible caulk. Smooth with a wet finger and let it cure fully before cleaning the surface.
- Gap is 3mm or wider: There's no clean fix — recut a new tile. Any visible filler solution will look noticeably worse than a tight cut over time.
- Tile sits higher than adjacent tiles: Too much mortar underneath. Lift the tile immediately (you have a short window), scrape back the mortar, and re-set. Work quickly — once thin-set starts to skin, you lose adhesion.
- Tile sounds hollow when tapped: Insufficient mortar contact. Remove the tile, apply fresh mortar with good ridge coverage, and re-set. Aim for at least 95% mortar contact, especially in doorway areas where foot traffic concentrates stress.
Protecting the Door Frame During Cutting
When you undercut the door casing, you're working close to finished wood or painted trim. Protect it with these steps:
- Apply painter's tape to the casing surface before undercutting — it protects the finish and gives you a clear visual stop line.
- Cut shallower than you think necessary, test-fit, then remove more material. You can always take more off; you can't put it back.
- If you nick the casing finish, touch it up with matching paint or wood stain before setting the tile — once the tile is in place, you can't access that area cleanly to repaint.
- Keep a vacuum running nearby during oscillating tool work to capture fine dust before it settles into the subfloor adhesive surface.
If you're updating door hardware at the same time — replacing knobs or adding a handle set — read our guide on how to install a door handle set to make sure you sequence those tasks correctly relative to the tile work.
Keeping Your Tile Edges Looking Clean Long-Term
The work doesn't stop when the grout dries. Tile installed around door frames takes more abuse than tile anywhere else in a room — concentrated foot traffic, door vibration, and repeated cleaning all stress the edges and transition joints. Consistent maintenance keeps your results looking professional.
Grout and Caulk Maintenance
- Inspect the caulk joint at the door casing every 6–12 months. It's the first place you'll see cracking or separation because it absorbs the frame's movement.
- When caulk starts to crack or pull away from either surface, remove it completely with a utility knife or caulk remover tool before re-applying. Never caulk over existing caulk — new caulk won't bond to old caulk reliably.
- Clean grout joints with a pH-neutral floor cleaner. Avoid bleach-based products for routine cleaning — bleach breaks down grout binders and causes premature crumbling.
- For mold in grout lines, apply a 1:10 bleach-to-water solution, scrub with a stiff grout brush, and rinse thoroughly. Treat this as a targeted fix, not routine maintenance.
When to Re-Seal or Re-Grout
Grout sealant is what stands between your grout lines and moisture damage. Here's when to act:
- Re-seal grout: Every one to two years in high-traffic doorway areas. Test readiness by dripping a few drops of water onto the grout — if the water absorbs rather than beads up, it's time to re-seal.
- Re-grout: When grout lines are crumbling, deeply cracked, or stained beyond what cleaning can fix. Use a grout saw or oscillating tool to remove the old grout completely before applying new — never grout over grout.
- Replace individual tiles: Tiles near door frames can crack from impact or point loads. You can replace a single tile without touching the rest of the floor — which is why you should always save at least 10% of your original tile as replacements.
Keeping the threshold area well-maintained also has a direct effect on security. A deteriorating tile joint at the door threshold allows moisture to penetrate the subfloor and eventually weaken the door frame structure — and a compromised frame makes the door itself easier to force open.
Frequently Asked Questions
What is the best tool for cutting tile around a door frame?
A wet tile saw is the best tool for precise straight and L-shaped notch cuts. For undercutting the door casing itself, an oscillating multi-tool gives you the most control and the cleanest result. If you don't own a wet saw, an angle grinder with a diamond blade is a capable alternative for ceramic or porcelain tile.
Do I need to undercut the door casing when installing tile?
Yes, in most situations. Undercutting the casing allows the tile to slide underneath for a seamless, professional finish. It looks far cleaner than a notch cut that butts up against the casing face. The process takes only a few minutes with an oscillating multi-tool and makes a significant difference in the final appearance.
Can I use a snap tile cutter to make notch cuts at a door frame?
No. Snap cutters are only capable of straight cuts across the full width of a tile. The L-shaped or irregular notch cuts needed at a door frame require a wet saw or angle grinder. Attempting a corner notch with a snap cutter will crack the tile.
Should I use grout or caulk where the tile meets the door casing?
Always use caulk at that joint — never grout. Door frames expand and contract with changes in humidity. Grout is rigid and will crack at a moving joint within months. Use a sanded, flexible caulk that matches your grout color for the best visual result and long-term performance.
How do I prevent chipping on the cut edge of my tile?
Cut slowly and let the blade do the work. Keep the blade cool with the wet saw's water supply. Make sure your diamond blade is sharp — a dull blade generates heat and causes edge fractures. For notch cuts, score along your lines first before completing the full cut. Applying masking tape over the cut line on the tile face also reduces surface chipping.
What should I do if my tile cut comes out too wide?
If the gap is under 3mm, fill it with color-matched flexible caulk and smooth it with a wet finger — this is an acceptable finish at a transition joint. If the gap is wider than 3mm, cut a new tile. There's no reliable way to fill a large gap cleanly, and any attempt will look noticeably worse than a properly fitted tile within a short time.
How long should I wait before grouting after setting tile near a door frame?
Wait at least 24 hours after setting the tile before you begin grouting. In cold or humid conditions, extend that to 48 hours. Door threshold areas get foot traffic quickly, so put up a physical barrier — a piece of plywood or a "wet tile" sign — to keep people off the tile until the mortar cures completely. Walking on uncured tile can shift it out of alignment.
Final Thoughts
Cutting tile around a door frame is a skill that becomes easier every time you do it — and the results speak for themselves when done right. Measure twice, cut once, and never skip the dry-fit. When you're ready for your next home project, browse the full home improvement guides on SecureOne for step-by-step instructions that take the guesswork out of every job, from flooring and doors to security upgrades that protect everything you've built.


About Vincent Foster
Greetings, This is Tom Vincent. I’m a home Security Expert and Web developer. I am a fan of technology, home security, entrepreneurship, and DIY. I’m also interested in web development and gardening. I always try to share my experience with my reader. Stay Connected and Keep Reading My Blog. Follow Me: Facebook, Twitter, Pinterest
Now you can get FREE Gifts. Or latest Free Security Cameras here.
Disable Ad block to reveal all the gifts. Once done, hit a button below