Roughly 34% of home burglaries involve entry through a sliding glass door, and a worn or broken handle is one of the most overlooked vulnerabilities in any home. If you've been putting off learning how to replace a sliding door handle, this guide gives you everything you need to get the job done correctly. Whether your latch is sticky, your lock refuses to turn, or the handle has completely failed, the fix is more achievable than you think. This is one of the best home improvement projects you can tackle on a weekend — no contractor required.
Sliding door handles take a beating. Every push and pull adds stress to the latch mechanism, the screws, and the handle body. Most handles last between five and fifteen years before they begin to fail — and when they do, your door stops being a security asset and starts being a liability. The good news is that replacing a handle requires no special expertise, just the right information and about thirty minutes of focused effort.
Before you buy a replacement, note your current handle's brand, the distance between mounting screws (called the "screw hole pitch"), and whether the lock cylinder is built into the handle or separate. Getting the right part before you start is the difference between a smooth job and a frustrating one.
Contents
What Makes Sliding Door Locks Unique
Sliding door locks work completely differently from the deadbolts and knob locks on hinged doors. Instead of a bolt that throws horizontally into a strike plate, most sliding door handles use a hook-style latch or cam mechanism that engages a keeper set into the door frame. When you lift or push the lever, an internal cam rotates and pulls the latch away from the keeper, freeing the door to slide. Understanding this helps you diagnose problems before they get worse.
According to the Cybersecurity and Infrastructure Security Agency (CISA), sliding glass doors are among the most frequently exploited entry points in residential break-ins. A functional, properly installed handle and lock is your first defense against that statistic.
How the Mechanism Works
The handle connects to an internal latch bar. When you operate the lever, a cam rotates and either hooks into or releases from the keeper in the frame. If the lock cylinder is integrated, engaging it drops a secondary pin that prevents the cam from rotating. If any part of this chain is worn or bent, the whole system fails — the latch may not catch, the lock may not engage, or the handle may simply feel loose and unreliable.
Types of Sliding Door Lock Cylinders
Some handles include a keyed lock cylinder for exterior access. Others use a thumb turn. A third type uses a two-point system that locks both the top and bottom of the door simultaneously, making it significantly harder to force open. Each type has a different replacement procedure, so identify yours before ordering a replacement.
Repair or Replace? Making the Right Call
Not every sliding door handle problem requires a full replacement. Sometimes a few drops of silicone lubricant and a tightened screw solve the issue in five minutes. Knowing when to stop short of replacing the whole unit saves you money and effort. For a broader look at what's fixable, the guide on the most common door lock problems is a useful starting point.
Repair the handle when it's structurally intact but stiff, the screws are loose but the body is undamaged, or the latch is striking incorrectly because the door track has shifted slightly. Replace the handle when the body is cracked, the latch no longer catches reliably, the lock cylinder is seized and won't respond to a key, or the lever itself has broken away from the mechanism.
If your handle wiggles even after you fully tighten the screws, the body threads are stripped — replace the unit, not just the fasteners.
Cost Expectations
A quality replacement sliding door handle runs between $25 and $150, depending on material and lock complexity. Stainless steel and die-cast aluminum options at the higher end hold up far better in outdoor environments exposed to UV and moisture. Spending an extra $30 upfront can save you from replacing the handle again in two years.
Comparing Sliding Door Handle Types
Choosing the right handle style matters as much as finding the right dimensions. The table below gives you a quick reference for the most common options on the market.
| Handle Type | Lock Included | Best For | Typical Price | Durability |
|---|---|---|---|---|
| Hook latch (standard) | Optional | Most residential patio doors | $25–$60 | Medium |
| Two-point locking | Yes | High-security applications | $80–$150 | High |
| Keyed cylinder | Yes (key access) | Doors needing exterior entry | $45–$100 | High |
| Thumb turn only | Interior turn lock | Interior or low-traffic doors | $20–$50 | Medium |
Always confirm the screw hole pitch and the handed orientation (left- or right-hand) before purchasing. A handle designed for the wrong side will have the latch facing the wrong direction and won't function.
How to Replace a Sliding Door Handle, Step by Step
With the right part in hand and about thirty minutes of uninterrupted time, you can complete this replacement with only basic tools. This is the same category of job as installing a deadbolt lock — straightforward once you understand the sequence.
What You'll Need
Gather a Phillips head screwdriver, a flathead screwdriver, a measuring tape, your replacement handle, and a dry cloth. A can of silicone spray is useful but not required. No power tools necessary.
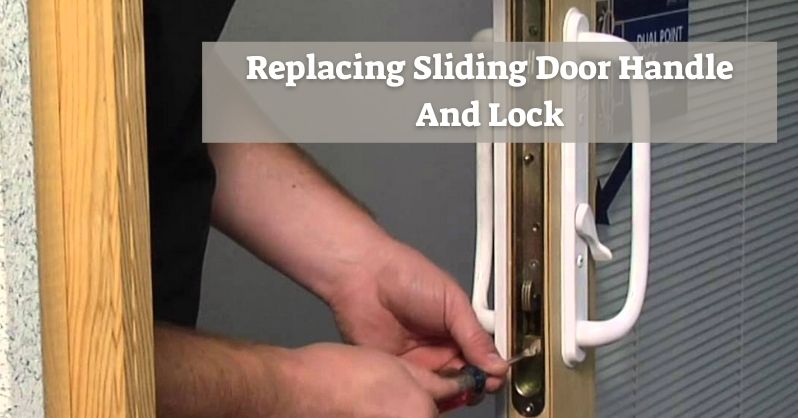
Removing the Old Handle
Open the door about halfway — this gives you a stable working position without the door shifting. Look for screws on the interior face of the handle assembly. Some handles hide their screws behind a snap-on plastic cover; use a flathead to pry it off gently from one corner. Remove both screws, then carefully pull the interior and exterior handle halves apart. The latch bar typically slides out with the handles, so don't let it drop into the door cavity. Clean the door cutout with a dry cloth before proceeding — debris inside the cavity causes alignment problems with the new hardware.
Installing the New Handle
Slide the new latch bar into the door cavity first, making sure it's oriented correctly (hook facing the frame). Then position the interior and exterior handle halves so the connecting spindle passes cleanly through the latch mechanism. If it resists, the alignment is off — don't force it. Once aligned, hand-tighten both screws, test the latch operation several times, then fully tighten. Never overtighten; stripping the threads or cracking a plastic housing means starting over. Test the lock cylinder five or six times, both locked and unlocked, before calling the job complete.
Mistakes That Set You Back
The most expensive mistake you can make is buying the wrong handle. Screw hole pitch varies by manufacturer, and a mismatch of even a few millimeters means the handle won't mount flush. Measure your existing handle before you order anything.
The second most common error is ignoring the handed orientation. A left-hand handle on a right-hand door puts the latch facing away from the strike plate. The door won't lock. Check which direction your door slides from the interior before purchasing.
Other mistakes worth avoiding include reusing screws from the old handle (stripped threads damage the new hardware immediately), forgetting to check the strike plate alignment after installation, and applying too much lubricant inside the lock cylinder, which attracts dust and causes binding within a few months.
When Things Don't Go as Planned
Even a careful installation can hit snags. Here's how to handle the most common issues.
The Latch Won't Catch the Strike Plate
This almost always means the door has shifted in its track, and the latch and keeper are no longer aligned. Loosen the keeper screws, shift the keeper slightly toward the latch, and retighten. Test the door several times. If the door itself is sagging, adjusting the rollers at the bottom of the panel (usually accessible via a small hole in the door edge) often corrects the alignment.
The Handle Feels Loose After Installation
Either the screws aren't fully seated, or the screw hole pitch is slightly off and the handle body is flexing sideways under load. Remove the handle, re-confirm your measurements, and verify the part number matches your door. If the pitch is correct but looseness persists, the door panel itself may have internal damage around the cutout.
The Lock Cylinder Won't Turn
This usually means the cylinder wasn't fully seated during installation, or the cam inside is misaligned with the latch mechanism. Remove the handle, re-seat the cylinder, and reinstall. If the cylinder is still binding with the correct part properly installed, it may be defective — return it. For a broader look at how sliding doors factor into your home's overall security, the guide on how to burglar-proof your home covers layered strategies worth knowing.
The Truth About Sliding Door Security
The most persistent myth about sliding doors is that they're impossible to secure regardless of what hardware you install. That's simply not accurate. A quality two-point locking handle paired with a secondary bar lock or security pin in the track creates a door that's genuinely difficult to force open. The weak point isn't the door itself — it's usually outdated or failed hardware.
Another widespread belief is that smart locks can't work on sliding doors. Several manufacturers now produce sliding-door-specific smart locks that retrofit directly into standard handle cutouts. If you want to take your security to the next level, the guide on how to install a smart lock walks through the full process.
Finally, some people assume that replacing the handle alone is sufficient. The handle is critical, but it's part of a system. While you have the door open for this project, check the track for debris, inspect the rollers for wear, and look at the frame for signs of warping. A perfectly installed handle on a compromised door is still a weak point. Also consider reading how to replace a front door if your exterior entry points need a broader security review.
Frequently Asked Questions
How do I know if my sliding door handle needs to be replaced or just repaired?
If the handle body is cracked, the latch no longer catches reliably, or the lock cylinder is seized and unresponsive to the key, replace the unit. If the handle is structurally intact but stiff or loose from worn screws, a cleaning, lubrication, and tightening may be all you need.
What is screw hole pitch and why does it matter?
Screw hole pitch is the center-to-center distance between the two mounting screws on your handle. It varies by manufacturer and model. If your replacement handle's pitch doesn't match your door's existing holes, the handle won't mount correctly. Always measure before purchasing.
Can I replace a sliding door handle without removing the door from the track?
Yes. In most cases you can replace the handle with the door in the track. Open it halfway to create a stable working position, and the interior and exterior handle halves will come apart without needing to remove the panel.
Do sliding door handles come in left-hand and right-hand versions?
Yes. The handed orientation determines which direction the latch faces. Standing inside your home, note which direction the door slides to open. If it slides to the right, you need a right-hand handle. Getting this wrong means the latch will face away from the strike plate and the door won't lock.
How do I add extra security to my sliding door after replacing the handle?
Install a secondary bar lock or a cut-down wooden dowel in the door track — this prevents the door from being forced open even if the handle lock is defeated. A two-point locking handle that secures both top and bottom of the door is also a significant upgrade over a standard single-point hook latch.
A sliding door handle is a small piece of hardware with an outsized impact on your security — replace it right once, and your door works for you instead of against you.


About Vincent Foster
Greetings, This is Tom Vincent. I’m a home Security Expert and Web developer. I am a fan of technology, home security, entrepreneurship, and DIY. I’m also interested in web development and gardening. I always try to share my experience with my reader. Stay Connected and Keep Reading My Blog. Follow Me: Facebook, Twitter, Pinterest
Now you can get FREE Gifts. Or latest Free Security Cameras here.
Disable Ad block to reveal all the gifts. Once done, hit a button below