Last summer, I let the back door swing open in a gust of wind and watched it slam so hard the door frame cracked. My hands were full of groceries, the wind caught the door, and there was nothing I could do. That moment stuck with me. It turned out that learning how to make a door stopper at home was one of the easiest fixes I've ever done — and it costs practically nothing. If you want a head start, our DIY door stoppers guide covers dozens of styles worth bookmarking.
You don't need a workshop full of tools or advanced DIY skills to build a solid door stopper. Most designs use materials you already own — leftover fabric, a bag of sand, some rope, or even an old toy sitting in the closet. The style you choose depends on how heavy your door is, what type of floor you're working on, and how much time you want to spend.
This guide walks you through everything from gathering supplies to choosing the right build for your space. You'll also learn when a homemade stopper is the smartest move and when a purpose-built solution makes more sense. Let's get into it.
Contents
Gather Your Supplies Before You Start
The fastest way to kill momentum on any DIY project is stopping mid-build to hunt for materials. Spend five minutes pulling everything together upfront and the actual build goes smoothly. Most door stopper projects cost under five dollars — and in many cases, you spend nothing because you're repurposing what's already around the house.
Basic Materials You'll Need
For the most popular builds — the fabric sand stopper and the pillow-style stopper — you need heavy fabric (denim, canvas, or upholstery scraps all work well), a filler material like play sand, rice, or dried beans for weight, a needle and thread or a sewing machine, and scissors. That's the entire list. For the rope-and-concrete version, you'll also need a short length of rope, a small bag of quick-set concrete mix, and a plastic cup or bucket to use as a mold.
If you can't find sand, dry rice or dried lentils work just as well as a filler — and they're cheaper. Just make sure your fabric seams are tight so nothing leaks out over time.
Optional Upgrades for a Better Finish
A few small additions make a real difference in how your stopper looks and holds up long-term. Iron-on interfacing stiffens fabric stoppers so they keep their shape after repeated use. Non-slip rubber shelf liner cut to match the base prevents the stopper from skating across hardwood or tile. A hot glue gun speeds up assembly if you're not confident with a needle and thread. None of these are required, but each one adds noticeable value without adding significant cost.
Which Type of DIY Door Stopper Is Right for You?
There are more ways to build a door stopper than most people realize. Each design handles a different door weight, suits different floor types, and takes a different amount of skill to finish. If you're also curious about pre-built alternatives, the spring door stopper roundup covers some excellent ready-made options — but for a fully custom build at near-zero cost, one of these five approaches will cover almost any situation in your home.
DIY Stopper Comparison at a Glance
| Stopper Type | Materials | Difficulty | Best For | Estimated Cost |
|---|---|---|---|---|
| Fabric sand stopper | Fabric, sand, thread | Easy | Interior doors, any floor | $0–$3 |
| Rope concrete stopper | Rope, concrete mix, mold | Medium | Heavy exterior doors | $3–$6 |
| Weighted pillow stopper | Fabric, fiberfill, rice | Easy | Light interior doors | $0–$2 |
| Leather handle stopper | Leather strap, bolt, washer | Medium | Stylish living spaces | $5–$10 |
| Repurposed toy stopper | Old toy, rubber feet | Easy | Kids' rooms, casual use | Free |
According to Wikipedia's overview of door stoppers, these devices date back centuries and range from simple wedges to spring-mounted wall fixtures. Your DIY version sits firmly in the wedge tradition — proven, reliable, and infinitely customizable for any room in the house.
Beginner Builds vs. More Advanced Projects
Not every build is suited for every skill level. The good news is that the easiest options are also the most practical for everyday situations. Start simple, see how it performs, then scale up if you need something heavier or more polished.
Easy Options for First-Timers

The weighted pillow stopper is the most beginner-friendly build on this list. Cut two rectangles of heavy fabric about 6 inches by 12 inches, sew three sides together into a tube, fill it with rice or dried beans until it's firm but not stiff, then sew the open end closed. That's the entire project. A finished pillow stopper holds a standard interior door open reliably without any slip risk on carpet or area rugs, and the whole thing takes under half an hour.
The repurposed toy stopper is even simpler — no sewing required at all. Find a toy with some weight to it (a rubber duck or a chunky plastic figure works well), add a few adhesive rubber feet to the base, and you have a stopper that doubles as room decor. Kids' rooms love these. They hold light hollow-core doors without any issue and they're easy to relocate whenever needed.

Builds Worth the Extra Effort

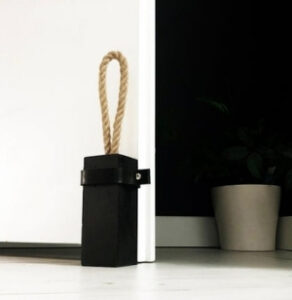
The leather handle stopper requires a bit more confidence with tools, but the result looks polished and intentional. Cut a thick leather strap about 8 inches long. Punch or drill a hole through one end, thread a bolt and washer through it, and secure it to a heavy base — a smooth river stone or a dense wood block both work well. The leather loop becomes a handle you grab to move the stopper easily. This style fits beautifully in living rooms and home offices where appearance matters as much as function.
How to Make a Door Stopper: Step-by-Step Methods
These two methods cover the most reliable and widely used DIY designs. The first is all-fabric and finished in under 30 minutes. The second takes longer but handles heavy doors and outdoor conditions without flinching. If you've already learned how to install a door stopper before, use that same door position as your size reference so your homemade version fits perfectly.
The Fabric Sand Stopper
Cut your fabric into a rectangle roughly 8 inches wide and 16 inches long. Fold it in half lengthwise with the patterned side facing inward. Sew along the two open edges, leaving one short end open. Turn the tube right-side out so the seams are hidden inside. Pour dry play sand into the tube until it's about three-quarters full and feels dense when you press it. Fold the open end inward by about half an inch and sew it shut. Add non-slip rubber liner to the base if you're placing it on hardwood or tile. The finished stopper should feel heavy and firm — if it's too light, it won't hold the door against any air pressure from an open window across the room.
The Rope Concrete Stopper
Mix your quick-set concrete according to the package directions — one cup's worth is enough for most stoppers. Pour it into a plastic cup or silicone mold. Before it sets (usually within the first few minutes of mixing), press a folded loop of rope into the top center so the loop sticks out above the surface. Hold it steady for a minute until the concrete grips it. Let the stopper cure fully — at least 24 hours — before putting it to use. The rope loop gives you a handle to pick it up and move it without scraping your floor. This is the right build for heavy exterior doors that face real wind pressure from outside.
Small Tricks That Make Your Stopper Work Better
Knowing how to make a door stopper is one thing. Making it work perfectly in your specific space is another. These small adjustments take almost no extra time but produce a noticeable improvement in everyday performance.
Never finalize your stopper's size by guessing — hold it up against the door in position first. A stopper even slightly too thin will shift out of place the moment the door presses against it with any force.
Getting the Size Right
The height of your stopper matters more than most people think. It needs to contact the door at a point close enough to the floor that the door can't ride over it when pushed. For most standard interior doors, a stopper between 2.5 and 4 inches tall at its highest point is the right range. Too short and the door kicks right over it. Too tall and the door won't swing open far enough to be useful. Measure the gap under your door at its intended stopping point before you finalize your fabric dimensions.
Stopping Slips on Smooth Floors
On hardwood, laminate, or tile, even a heavy fabric stopper can shift under sustained pressure. The fix is simple: cut a piece of rubber shelf liner to match the bottom of your stopper and attach it with a few drops of super glue or a strip of double-sided tape. This single addition keeps your stopper exactly where you placed it regardless of how firmly the door presses against it. It's a five-minute step that most first-time builders skip — and then wonder why their stopper keeps creeping across the floor.
When to Make One — and When to Buy
A homemade door stopper is a smart solution in many situations. But it's not always the right answer. Understanding where the line is saves you time and prevents frustration.
Situations Where Homemade Works Great
A handmade stopper is the perfect solution for interior doors in low-risk rooms, rental units where you can't drill or mount anything, and any situation where you need a quick budget-friendly fix. They're also pet-safe — a weighted fabric stopper won't injure a dog or cat that bumps into it, and it's easily moved from room to room. If you're also thinking about door-level security more broadly, it helps to understand how a device like an Addalock portable door lock works alongside a stopper for layered entry protection.
When a Dedicated Product Makes More Sense
For exterior doors, security doors, and fire-rated doors, a commercial stopper is the better choice. These doors carry more weight, face more wind pressure, and in some cases have code requirements a fabric wedge won't meet. A handmade sand stopper won't reliably hold a heavy steel door on a gusty day. If you're shopping for something purpose-built, the best security door stoppers reviewed here handle situations where a homemade version falls short. And if you're thinking about the next layer of protection beyond the stopper itself, Bluetooth door locks are worth considering as a natural upgrade for entry points.
Frequently Asked Questions
What is the best filling for a homemade door stopper?
Play sand is the most reliable filler because it's dense, stays evenly distributed, and doesn't degrade over time. Dry rice and dried lentils are excellent alternatives — they're slightly lighter but still provide enough weight for most interior doors. Avoid anything that compacts unevenly or shifts dramatically with movement, like loose gravel or shredded fabric on its own.
How long does it take to make a fabric door stopper?
Most fabric sand stoppers take between 20 and 40 minutes from start to finish, including cutting, sewing, and filling. If you use a sewing machine instead of hand-stitching, you can cut that time in half. The rope-and-concrete stopper adds a 24-hour curing period before it's usable, though the hands-on build time is only about 15 minutes of active work.
Can a homemade door stopper work on carpet?
Yes — and it often performs better on carpet than on smooth floors because the fabric base grips the fibers naturally without any additional non-slip material. Weighted pillow stoppers and fabric sand stoppers both do well on carpet. The main thing to check is that your stopper is tall enough to catch the door edge, since carpet raises the effective floor height slightly compared to bare hardwood or tile.
The best door stopper is the one you actually build — a custom-fit, nearly free solution you made in an afternoon will outperform an empty doorway every single time.


About Vincent Foster
Greetings, This is Tom Vincent. I’m a home Security Expert and Web developer. I am a fan of technology, home security, entrepreneurship, and DIY. I’m also interested in web development and gardening. I always try to share my experience with my reader. Stay Connected and Keep Reading My Blog. Follow Me: Facebook, Twitter, Pinterest
Now you can get FREE Gifts. Or latest Free Security Cameras here.
Disable Ad block to reveal all the gifts. Once done, hit a button below