The first time a door swings back hard enough to punch a fist-sized hole in your drywall, you never forget it. One strong gust through an open window, one too-eager push from a kid, and suddenly there is a doorknob-shaped crater in your freshly painted wall. That single moment is what drives most homeowners to finally learn how to install a door stopper — and the good news is it is one of the easiest, most affordable home repairs you will ever make. A door stopper (also called a doorstop) is a simple device that prevents your door from swinging too far open and damaging your walls, trim, or door hinges.
Door stoppers have been a home staple for over a century. According to Wikipedia, doorstops come in many forms — from simple rubber wedges to wall-mounted springs to heavy fixed posts. Before you buy, browse our 10 Best Security Door Stopper Reviews to find the right model for your situation. You can also find more hands-on projects in our home improvement guides.
The actual installation takes less than 15 minutes for most doorstop types. You do not need any special skills or professional help. All you need is the right doorstop for your situation, a few basic tools, and the step-by-step instructions laid out below.
Contents
- Why Door Stoppers Matter More Than You Think
- What You'll Need Before You Start
- Types of Door Stoppers: Weighing Your Options
- How Much Does It Cost to Install a Door Stopper?
- How to Install a Door Stopper: Step-by-Step
- Real-World Installation Scenarios
- Common Problems and Quick Fixes
- Frequently Asked Questions
Why Door Stoppers Matter More Than You Think
Most homeowners only think about doorstops after something goes wrong. A cracked wall, a broken hinge, a doorknob that digs a permanent groove into the baseboard — all of it is preventable. But door stoppers do more than just protect your paint job.
- They protect door hinges from the stress and torque caused by sudden impacts and rebounds.
- They prevent injuries — a door flying open can hit a child, a pet, or anyone standing close by.
- They reduce noise from doors slamming hard into walls during windy days or quick exits.
- On exterior doors, they keep the door from bouncing back closed while you are carrying in groceries or moving furniture.
- Security-style barricade stops add a layer of physical resistance against forced entry — useful on any door that faces outside.
- They extend the lifespan of your door frame, trim, and hardware by eliminating repeated impact stress.
Think of a door stopper as a $10 investment that saves you hundreds in drywall repairs and hinge replacements. It is a small fix with an outsized return. And it takes less time to install than it does to mix a batch of drywall compound.
What You'll Need Before You Start
You do not need a full toolbox for this project. Most installations only require items you probably already own.
Basic Tools
- Power drill or Phillips-head screwdriver
- Measuring tape
- Pencil for marking hole positions
- Stud finder (only needed for wall-mounted types)
- Level (for floor-mounted models to ensure a straight mount)
- Hammer (for hinge-pin removal on hinge-mounted types)
Materials
- Your chosen door stopper (with hardware included)
- Wall anchors if you are mounting into drywall without hitting a stud
- Concrete or masonry anchors if your floor is tile or concrete
- Painter's tape — optional, but useful for marking clean drill points without pencil marks on the wall
Before buying anything, measure the clearance between the bottom of your door and the floor. A floor-mounted stop needs enough room to sit without scraping the door as it swings. Standard interior doors have about 3/4 inch of clearance — more than enough for most stops.
Types of Door Stoppers: Weighing Your Options
Picking the right type before you go to the hardware store saves you a wasted trip and a wrong purchase. Each type has genuine trade-offs worth knowing.
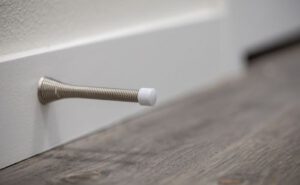
Spring Door Stoppers
These screw into your baseboard or floor near the wall. A flexible metal coil with a rubber tip absorbs the door's impact when it swings into it.
- Pros: Cheap, fast to install, works on almost every interior door
- Cons: Makes a "boing" sound on contact, can bend out of shape on heavy doors, limited stopping force
- Best for: Lightweight interior doors like bedroom and bathroom doors
Hinge-Mounted Door Stoppers
These attach directly to the door hinge. A small metal arm extends from the hinge pin and catches against the door frame before the door can travel too far.
- Pros: Zero drilling into floors or walls, nearly invisible when the door is open
- Cons: Only fits standard butt hinges, limited range of adjustment
- Best for: Rental apartments or any space where you cannot drill
Floor-Mounted Door Stoppers
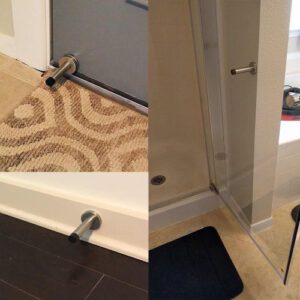
A solid post anchored to the floor that catches the bottom rail of the door. These are the most heavy-duty option available for residential use.
- Pros: Extremely stable, handles heavy solid-core doors, ideal for high-traffic areas
- Cons: Permanent installation, can be a tripping hazard if placed in a walking path
- Best for: Entry doors, garage doors, commercial-grade applications
How Much Does It Cost to Install a Door Stopper?
This is genuinely one of the cheapest home improvement projects on the list. The hardware is inexpensive, and the labor — when you do it yourself — costs nothing.
| Type | Product Cost | DIY Install Time | Pro Install Cost | Best For |
|---|---|---|---|---|
| Spring (baseboard) | $3 – $10 | 5 minutes | $30 – $60 labor | Interior rooms, light doors |
| Hinge-mounted | $5 – $15 | 5 minutes | $30 – $60 labor | Doors with standard butt hinges |
| Floor-mounted post | $10 – $30 | 10 – 15 minutes | $50 – $80 labor | Heavy doors, high-traffic areas |
| Wall-mounted bumper | $8 – $25 | 10 minutes | $40 – $70 labor | Doors that swing wide against walls |
| Security barricade bar | $25 – $80 | 15 – 20 minutes | $75 – $120 labor | Entry doors, added forced-entry resistance |
The bottom line: A DIY installation costs only the price of the hardware — typically under $20. Hiring a handyman adds $30 to $80 in labor for a job that takes under 15 minutes. Do it yourself. There is no reason not to.
How to Install a Door Stopper: Step-by-Step
Follow the section that matches your doorstop type. Each process is fast and does not require prior experience.
Installing a Spring Door Stopper
Pro tip: Before drilling, swing your door fully open and mark exactly where the knob or edge would hit the wall — then position the spring stop about 1 inch before that point so it catches the door before impact, not after.
- Open the door fully and observe where the knob or door edge would contact the wall or baseboard.
- Hold the spring stop against the baseboard about 1 inch before that impact point, with the rubber tip pointing toward the door's path.
- Mark the screw hole positions with a pencil.
- Pre-drill pilot holes using a bit slightly smaller than the included screws — this prevents splitting the baseboard wood.
- Drive the screws in firmly with a drill or screwdriver. Do not overtighten — you risk cracking the baseboard.
- Swing the door gently to confirm the spring tip makes contact before the door hits the wall.
- If the spring is angled incorrectly, bend it slightly by hand until the tip aligns with the door's path.
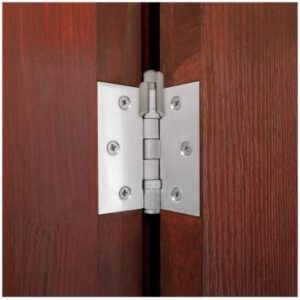
Installing a Hinge-Mounted Door Stopper
- Identify the top hinge on your door — this is where the stop will mount.
- Place a flathead screwdriver under the hinge pin and tap upward with a hammer to drive the pin out of the barrel.
- Slide the hinge-mounted stop ring over the hinge pin, with the stop arm facing toward the door frame side.
- Reinsert the pin through the stop and back down through the full hinge barrel.
- Tap the pin flush using the hammer until it sits level with the top of the hinge.
- Open and close the door slowly — the arm catches against the frame before the door travels too far.
- If the stop arm needs adjustment, bend it gently with pliers until the door stops at your desired opening angle.
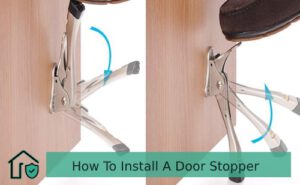
Installing a Floor-Mounted Door Stopper
- Open the door to the maximum position you want it to reach — this is where the post will stop it.
- Hold the floor post directly under the door's bottom rail edge and mark the base mounting holes on the floor.
- Use a level to verify the post is perfectly vertical before drilling.
- Drill pilot holes into the floor at your marked points. Use a masonry bit if drilling into concrete or ceramic tile.
- Insert wall anchors or concrete anchors into the holes as needed.
- Place the stopper base over the holes and drive in the mounting screws until snug and immovable.
- Test by swinging the door firmly against the post — it should absorb the impact without shifting or rocking.
If you are upgrading the full entry area while you are at it, pairing a solid floor-mounted stop with a smart lock is a smart combination. Our guide to the 7 Best Bluetooth Door Locks walks you through the top options for exterior doors at every budget level.
Real-World Installation Scenarios
Different doors create different problems. Here are the most common real-world situations and the solution that fits each one best.
Interior Bedroom Door with Drywall Behind It
This is the most common complaint — the knob punches through the wall on a hard swing.
- Best choice: Spring baseboard stop or wall-mounted rubber bumper at knob height
- Wall-mounted bumpers place rubber padding exactly where the knob strikes — highly precise protection
- Spring stops work just as well and cost a few dollars less
- Either installs in under five minutes on a standard interior door
Heavy Solid-Core Exterior Front Door
Front doors are heavier, often exposed to wind, and take far more abuse than interior doors.
- Best choice: Floor-mounted fixed post stop
- Anchors firmly into the entry floor or porch surface for a solid, non-flex mount
- Handles the weight and wind load without bending or shifting over time
- If security is your concern, a barricade-style stop that braces under the door handle is worth considering
Rental Apartment Where Drilling Is Prohibited
No drill? You still have solid options that leave zero holes behind.
- Best choice: Hinge-mounted stop (replaces the hinge pin, no new holes) or a pressure-fit adhesive bumper
- Hinge-mounted stops are invisible when the door is open and completely reversible
- Heavy rubber wedge stops need no tools at all, though they only hold the door in the open position rather than limiting swing
High-Traffic Hallway or Garage Door
- Best choice: Heavy-duty floor-mounted post with a rubber impact cap
- Look for stops rated for doors over 100 lbs if your door is a solid-core or metal model
- Use concrete anchors if you are mounting on a garage slab or tiled entryway
- Replace the rubber tip cap every year or two in high-use areas — they compress and wear down over time
Common Problems and Quick Fixes
Even a simple installation can hit a snag. Here is what to do when the results are not quite right.
The Spring Stop Keeps Bending Out of Position
- The spring is absorbing too much force — your door is probably too heavy for a standard coil spring
- Fix: Upgrade to a heavy-duty spring stop rated for solid-core doors, or switch to a floor-mounted post entirely
The Mounting Screw Won't Hold in the Baseboard
- Baseboards are thin — the screw may be bottoming out in hollow space behind the board
- Fix: Use a longer screw to reach the wall stud behind the baseboard, or drive a threaded drywall anchor through the baseboard into the wall
The Floor-Mounted Stop Wobbles After Installation
- Pilot holes may be too wide, or the anchors are not fully seated
- Fix: Remove the stop, swap in slightly larger anchors, and remount — the fresh anchors will grip the wall of the hole securely
The Door Bounces Off the Stop Instead of Holding
- This almost always means the rubber tip is worn flat or cracked
- Fix: Replace the rubber tip cap — sold at any hardware store for under $2, and they thread or press onto most spring and post stops
The Hinge-Mounted Stop Slips Down Over Time
- The hinge pin may be slightly worn, giving the stop collar room to creep downward
- Fix: Add a small metal washer above the stop collar on the pin — it creates friction and holds the stop in position without any modification to the hinge itself
Frequently Asked Questions
Can I install a door stopper without drilling?
Yes. A hinge-mounted door stopper requires zero drilling — it threads onto your existing hinge pin and removes just as easily. Adhesive wall bumpers are another no-drill option, though they work best on lightweight interior doors with smooth painted walls. Rubber wedge stops also require no tools at all, but they only hold the door in the open position rather than limiting how far it can swing.
What is the best door stopper type for security?
A floor-mounted barricade bar or door security bar is the strongest option for entry doors. These models brace under the door handle at an angle and anchor to the floor, creating significant resistance against forced entry that a deadbolt alone cannot provide. Standard spring stops are not security devices — they only prevent wall damage. For a full product comparison, see our curated list of the best security door stoppers.
How high off the floor should I mount a spring door stopper?
Mount it directly on the baseboard, roughly 2 to 3 inches above the floor. The rubber tip should make contact with the bottom edge of the door — not the knob and not the middle of the door panel. This is the most effective stopping position and keeps the stop tucked low and out of sight when the door is closed.
A $10 doorstop and 10 minutes of your time will protect your walls, your hinges, and your sanity far better than any amount of drywall patching ever could.


About Vincent Foster
Greetings, This is Tom Vincent. I’m a home Security Expert and Web developer. I am a fan of technology, home security, entrepreneurship, and DIY. I’m also interested in web development and gardening. I always try to share my experience with my reader. Stay Connected and Keep Reading My Blog. Follow Me: Facebook, Twitter, Pinterest
Now you can get FREE Gifts. Or latest Free Security Cameras here.
Disable Ad block to reveal all the gifts. Once done, hit a button below