Have you ever stared at a loose, squeaky door handle and wondered if you actually need to call a locksmith — or if you could just fix it yourself? You can. How to install a door handle set is one of those DIY skills that sounds complicated but is genuinely manageable once you break it into clear steps. Whether you're upgrading an old handle for security reasons, replacing a broken one, or finishing a fresh door, this guide walks you through everything. Bookmark our door installation resource hub for related projects while you're at it.

A standard exterior handle set comes with more pieces than you might expect: an exterior lever or knob, an interior turn piece, a latch bolt assembly, a strike plate, and mounting hardware. Some sets bundle in a deadbolt cylinder too. If security is a driving factor, pairing your new handle with a solid deadbolt is the right call — our overview of the different types of deadbolts helps you pick the right one for your door.
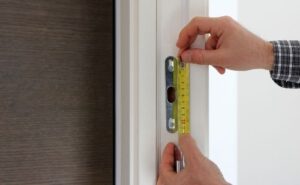
Before you touch anything, check whether your new handle set fits your door's existing bore holes. Most residential doors use a 2-1/8-inch (54mm) cross bore and a 2-3/8-inch or 2-3/4-inch backset (the distance from the door edge to the hole center). If the new hardware doesn't match those dimensions, you'll need a hole-saw kit to resize. It's a 30-second check that saves a frustrating mid-project hardware run.
Contents
What You'll Need Before You Start
Gathering your tools first makes the whole process smoother. There's nothing worse than having the door half-disassembled and realizing you need a store run. Round everything up before you unscrew a single thing.
Essential Tools
- Phillips and flathead screwdrivers — most handle sets use Phillips screws, but some trim pieces take flathead
- Tape measure — for confirming backset and bore hole dimensions before you buy or install
- Chisel and hammer — needed when you're recessing the latch faceplate or strike plate flush into the door or frame
- Utility knife — for scoring paint or wood grain cleanly before chiseling
- Pencil or marker — marking hole positions and tracing strike plate outlines
- Drill with hole-saw bit — only necessary if you need to resize or relocate bore holes
It also helps to understand the basics of how door handles are engineered before you start — knowing what each component does makes it easier to spot when something is misaligned or installed backwards.
Optional but Helpful
- Magnetic screwdriver tip — keeps screws from tumbling into tight spots
- Painter's tape — protects the door finish around the bore area during drilling
- Level — confirms your strike plate sits perfectly straight before final screws go in
- Silicone spray — a quick lubrication fix if the latch feels stiff after installation
Choosing the Right Handle Set for Your Door
Not all handle sets are built the same, and picking the wrong one is one of the most common mistakes. The right choice depends on where the door is, what it connects, and what your security priorities are. If you want side-by-side comparisons of top-rated options before you shop, our roundup of the best front door handlesets is a solid starting point.
Entry vs. Interior Doors
Entry handle sets — the kind that goes on your front or back door — are built tougher. They're rated for higher security, made from heavier materials, and usually include a keyed cylinder. Interior handles are simpler: passage (no lock), privacy (push-button lock for bedrooms and bathrooms), or dummy (decorative only, no latch). Using an interior-grade handle on an exterior door is a genuine security risk. Don't cut that corner.
| Handle Type | Best For | Includes Keyed Lock? | Security Grade |
|---|---|---|---|
| Entry Handle Set | Front/back exterior doors | Yes | Grade 1 or 2 |
| Passage Handle | Hallways, closets | No | Grade 3 |
| Privacy Handle | Bedrooms, bathrooms | Push-button only | Grade 3 |
| Dummy Handle | Double doors, decorative use | No | N/A |
| Smart Handle Set | Front door, keypad/app entry | Electronic | Grade 1 |
Finish and Style Matching
Match the finish of your handle set to existing door hardware — hinges, kick plates, door knockers. Common finishes are satin nickel, oil-rubbed bronze, matte black, and polished brass. Mixing them looks unfinished and amateur. If you're unsure about your door's dimensions before ordering, our guide on how to measure a front door covers the exact steps so you don't end up with the wrong backset.
How to Install a Door Handle Set: Step-by-Step
Here's where the actual work happens. Follow these steps in order and you'll sidestep the most common installation headaches. If you're swapping out an existing handle, start by reading the complete guide to removing a door handle — a clean removal makes the new install go much faster.
Preparing the Door
- Confirm the backset on your new hardware matches the existing bore hole position
- Test-fit the latch assembly in the edge bore before driving any screws
- If the latch faceplate sits proud (sticking out) from the door edge, trace around it with a pencil and chisel a shallow mortise so it sits perfectly flush
- Clean out any old paint or debris from the bore holes so everything seats properly
Installing the Latch
Slide the latch bolt assembly into the edge bore with the beveled (angled) side of the latch bolt facing the direction the door closes against the frame. The bevel must face the door frame — install it backwards and the door won't latch at all. Secure the faceplate with its two screws. Don't overtighten; you want the latch to spring back and move freely without resistance.
Mounting the Handle
With the latch in place, thread the exterior handle's spindle — the square rod that connects both sides — through the latch mechanism. Align the interior handle on the opposite side so both levers sit level. Hand-tighten the mounting screws first to check alignment, then snug them down evenly. Test the handle before tightening fully: it should operate the latch smoothly with zero binding or stiffness.
Pro tip: If your handle feels stiff right after installation, a small amount of silicone-based lubricant on the latch mechanism fixes it instantly — avoid WD-40, which attracts dirt and gums up the mechanism over time.
Attaching the Strike Plate
Close the door slowly and mark where the latch bolt contacts the frame. Hold the strike plate over that mark, trace its outline, and chisel a shallow mortise so it sits flush with the frame surface. Drill a small pocket for the latch bolt to travel into, then secure the strike plate. Use 3-inch screws that reach the stud behind the frame — short screws are the single most common way to make a door easy to kick in, and it's a trivial fix to do right the first time.
Fixing Common Problems During Installation
Even careful installs hit snags. Here's how to diagnose and fix the two most common issues without pulling everything apart and starting over.
Handle Won't Latch Properly
If the door won't stay closed or the latch doesn't catch reliably, the strike plate is almost certainly misaligned. Apply a small amount of lipstick or chalk to the tip of the latch bolt, close the door fully, then open it — the transfer mark on the frame shows exactly where the bolt is landing. Adjust the strike plate to match. A misalignment of even 1/8 inch causes consistent latching failures.
If the latch bolt itself doesn't extend when you release the handle, the latch is likely installed backwards or the spindle isn't engaging the mechanism. Remove the interior handle and recheck both. Our guide on fixing a door knob covers overlapping troubleshooting steps that apply here too.
Loose or Wobbly Handle
A handle that wobbles after installation usually means the mounting screws aren't tight enough, or the spindle is the wrong length for your door's thickness. Standard door thickness is 1-3/8 inches for interior doors and 1-3/4 inches for exterior doors. If yours is a thick solid-wood or steel-core door, confirm your handle set is rated for that thickness. Tighten mounting screws gradually and alternate sides — this keeps the handle from canting to one side as you tighten.
Making Your Door Hardware Last
Installing the handle correctly is the foundation. Maintaining it — and knowing when it's time for an upgrade — determines how long it actually protects you.
Routine Maintenance
- Wipe the handle with a damp cloth monthly — never use abrasive cleaners that strip the finish
- Apply silicone spray to the latch mechanism once a year to keep it operating smoothly
- Re-tighten mounting screws every six months — daily use vibrates them loose gradually
- Inspect strike plate screws annually and replace any that have backed out with longer ones
Good maintenance also means recognizing warning signs early. If your handle starts feeling sticky, the lock cylinder gets hard to turn, or there's visible play in the lever, address it before it fails entirely. A compromised lock on your front door is a real vulnerability. For a broader look at entry security, our guide to the best front doors for security covers the full picture beyond just hardware.
When to Upgrade
Handle sets don't last forever. Here are the clear signs it's time to replace yours:
- Visible corrosion or pitting on the finish — that's structural weakening, not just cosmetics
- A key cylinder that's hard to turn even after fresh lubrication
- A latch bolt that no longer springs back reliably on its own
- Any Grade 3 handle set currently on an exterior door — upgrade to Grade 1
If you're considering going keyless during your upgrade, the technology has matured significantly. Smart locks are genuinely safe when you choose a reputable brand and install them properly. They pair well with traditional handle hardware and are worth considering if you want keypad or app-based access on top of a physical key option.
Frequently Asked Questions
How long does it take to install a door handle set?
For a straight swap on an existing door — same bore hole size and backset — most people finish in 30 to 45 minutes. If you're drilling new holes or working from scratch, budget 1 to 2 hours, especially if you need to chisel mortises for the latch faceplate and strike plate.
Do I need special tools to install a door handle set?
For a standard replacement, a Phillips screwdriver, tape measure, and pencil are all you really need. A chisel and hammer are required if the latch or strike plate needs to be recessed into the door or frame. A drill only comes into play if you're creating or enlarging bore holes.
What does "backset" mean on a door handle?
Backset is the distance from the edge of the door to the center of the bore hole where the handle mounts. The two standard backsets are 2-3/8 inches and 2-3/4 inches. Your new handle set must match the existing backset, or you'll need to reposition the hole — which requires a drill and hole-saw kit.
Can I install an exterior handle set on an interior door?
Technically yes, but it's overkill and often won't fit correctly. Exterior handle sets are larger, heavier, and built for weather resistance — none of which serves any purpose on an interior door. Use the appropriate grade and type for each location.
Why won't my new door handle latch after installation?
The most common causes are a misaligned strike plate, a latch bolt installed with the bevel facing the wrong direction, or a spindle that isn't properly engaging the latch mechanism. Recheck the latch orientation first — the beveled face must point toward the door frame — then use the chalk-mark method to pinpoint and adjust your strike plate position.
A door handle set done right is thirty minutes of work that pays off every single day — because your front door is only as secure as the hardware holding it shut.


About Vincent Foster
Greetings, This is Tom Vincent. I’m a home Security Expert and Web developer. I am a fan of technology, home security, entrepreneurship, and DIY. I’m also interested in web development and gardening. I always try to share my experience with my reader. Stay Connected and Keep Reading My Blog. Follow Me: Facebook, Twitter, Pinterest
Now you can get FREE Gifts. Or latest Free Security Cameras here.
Disable Ad block to reveal all the gifts. Once done, hit a button below