Ever stared at a worn-out, stuck, or outdated door knob and wondered how to get it off without calling a professional? Good news: once you understand the type of knob you're dealing with, knowing how to remove a door knob is well within reach for any homeowner. This complete walkthrough at SecureOne's door knob removal guide covers every knob type, every tool you'll need, and every common problem you might hit along the way.
Removing a door knob comes up more often than you'd think. Maybe you're upgrading to a smart lock, dealing with a knob that no longer latches properly, or repainting a door and need clean access to the surface. Whatever the reason, this is one of those DIY tasks where having the right information makes everything faster and cleaner. If the mechanism itself is the problem rather than the knob style, it's also worth checking out our guide on how to fix a door knob yourself before deciding whether full removal is actually the move.
Door knobs have been a standard part of home hardware for well over a century. According to Wikipedia's entry on door handles, the cylindrical door knob became common in North American homes during the late 19th century — and the core mechanisms haven't changed dramatically since. What has changed is the variety of fastening systems manufacturers use, which is exactly why removal steps differ depending on which type you have.
Contents
When You Actually Need to Remove a Door Knob
Before you pick up a screwdriver, be clear on why you're doing this. The reason shapes which steps apply and how careful you need to be with the existing hardware.
Upgrade and Replacement Scenarios
These are the most common reasons homeowners tackle this project:
- Upgrading to a smart lock or deadbolt — Many smart lock installations require removing the entire knob-and-latch assembly. If you're considering this route, our overview of the different types of door locks can help you choose the right replacement before you pull anything apart.
- Replacing a worn or outdated knob — Older knobs can feel loose, look dated, or simply stop matching updated hardware elsewhere in the home. Swapping them out is a quick cosmetic win.
- Moving into a new home — Rekeying or replacing locks is standard security practice whenever a property changes hands. You don't know who still has a copy of the previous owner's key.
- Repainting or refinishing a door — Removing the knob gives you cleaner access to the door surface and protects the hardware from overspray or drips.
Repair and Maintenance Scenarios
- The knob turns freely but fails to retract the latch bolt.
- The door won't stay closed or latches only part of the way.
- The knob is completely jammed — it won't turn in either direction.
- You need to access the latch bolt to fix a misalignment between the latch and the strike plate.
- Internal springs or components have broken and the whole assembly needs to come out.
In any of these situations, removal is the necessary first step. Whether you reinstall the same knob or put in something new is a separate decision you can make once you have everything out.
Tools You'll Need Before You Start
One of the best things about this job is that it requires almost nothing you don't already own. Gather these before you start — the jobs that stretch from 15 minutes to 45 minutes are almost always cases where someone didn't have the right tool in hand.
Basic Toolkit
| Tool | Purpose | Notes |
|---|---|---|
| Phillips-head screwdriver | Remove exposed mounting screws | Size #2 covers most residential knobs |
| Flathead screwdriver | Pop off decorative covers, pry tabs, release slots | Thin blade works best for tight spaces |
| Allen wrench (hex key) set | Loosen set screws on hidden-fastener knobs | 3/32" and 1/8" cover the majority of sizes |
| Needle-nose pliers | Grip and extract stuck spindles or spring clips | Optional but saves time on stubborn assemblies |
| Utility knife or putty knife | Score painted-over trim rings or latch faceplates | Score gently — avoid gouging the door surface |
Optional but Helpful
- Rubber mallet — useful when a latch faceplate is set deep or painted in place.
- Masking tape — protects the door finish around the knob while you work.
- Penetrating oil (WD-40 or similar) — loosens corroded screws so you don't strip them trying to force them.
- Small flashlight or phone torch — helps you spot a tiny pinhole or slot along the knob shank, especially in low-light hallways.
Understanding the Type of Door Knob You Have
This is the step most guides skip — and it's the one that causes the most frustration. Different knob designs require completely different removal methods. Spend 30 seconds identifying your type before you do anything else.
There are three main types you'll encounter in residential settings:
Knobs with Visible Screws
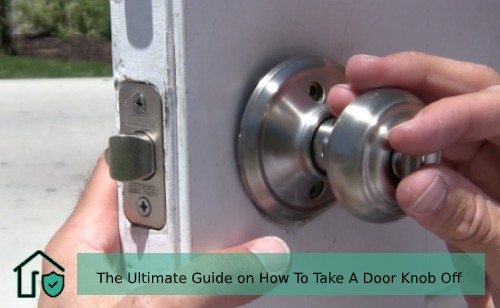
The simplest type to remove. You'll see two or more screw heads on the rose plate — the decorative disc that sits flush against the door face, typically on the interior side. These screws pass directly through the door into a mounting plate on the opposite side. Most common on older hardware and entry-level knob sets.
Knobs with Hidden or Recessed Fasteners

The most common type in homes built after the 1980s. No screws are visible anywhere on the rose plate. Instead, you'll find either a small slot, a tiny pinhole, or a recessed hex set screw somewhere along the shank (neck) of the knob. The design looks cleaner — but it requires knowing exactly where to look before you can proceed.
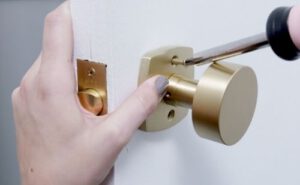
Knobs with a Cover Plate
Similar to the hidden fastener design, but here the mounting screws sit beneath a separate decorative cover plate or trim ring that snaps or slides over the base. You need to remove that outer layer first before any screws become accessible. Common on mid-range residential hardware installed in the last few decades.
How to Remove a Door Knob: Step by Step
Follow the section that matches your knob type. When you're not sure which type you have, check along the knob shank first — a pinhole or slot there is the most common configuration and immediately tells you which approach to use.
Removing a Knob with Visible Screws
- Work from the interior side of the door — the screws are almost always on the inside rose plate, not the exterior-facing one.
- Use a Phillips-head screwdriver to remove both screws completely. Set them in a small dish or your pocket — they disappear easily on carpet or hardwood.
- Pull the interior knob and rose plate straight away from the door face.
- Move to the exterior side — that knob should now pull free without resistance.
- You'll now see the spindle (the square metal rod that connected both knobs through the door). Slide it out.
- Proceed to remove the latch assembly (see the final subsection below).
Removing a Knob with Hidden Fasteners
- Inspect the shank of the interior knob carefully — look for a small slot, a pinhole, or a recessed hex screw along the neck where the knob meets the rose plate.
- If you find a slot: insert a thin flathead screwdriver into the slot, press inward toward the door, and simultaneously pull the knob off the spindle.
- If you find a pinhole: insert a straightened paperclip or small nail into the hole to depress the internal spring-release tab, then pull the knob straight off.
- If you find a set screw: fit the appropriate Allen wrench into the hex socket and turn counterclockwise until loose, then pull the knob free.
- Once the knob is removed, the rose plate will either unscrew or pop off. Look for a small notch along its edge and use a flathead to pry it away gently.
- The mounting screws are now exposed beneath the rose plate. Remove them with a Phillips-head screwdriver.
- Pull off the exterior knob from the other side of the door.
- Slide out the spindle and move to the latch removal step below.
Pro tip: If you can't locate the release point on a hidden-fastener knob, rotate the knob slowly while shining a flashlight along the shank at an angle — the pinhole or slot catches the light and becomes much easier to spot.
Removing a Knob with a Cover Plate
- Look around the outer edge of the decorative trim ring for a small gap, notch, or slot.
- Insert a thin flathead screwdriver or putty knife into that notch and gently pry the cover plate away from the door. Work around the perimeter gradually — don't apply all your force in one spot.
- If the cover plate feels stuck, it may be painted in. Score around the edge lightly with a utility knife before prying.
- Once the cover plate is off, the mounting screws are visible. Remove them with a Phillips-head screwdriver.
- Pull the interior knob assembly away from the door. The exterior knob will release from the opposite side.
- Remove the spindle and continue to the latch step.
Removing the Latch Assembly
This step is identical regardless of which knob type you had. Once both knobs are off:
- Open the door so you have comfortable access to its edge.
- Look at the door edge — you'll see the latch bolt protruding through a rectangular cutout, with a metal faceplate surrounding it.
- Find the two screws securing that faceplate to the door edge and remove both.
- Pull or push the latch assembly out through the circular hole in the door face.
- If the latch assembly is stuck, tap the latch bolt gently with a rubber mallet from the edge side — this frees it without damaging the bore hole.
At this point the door is completely clear of all knob hardware. If your next step is installing a replacement, our detailed guide on how to replace a front door lock with a keyed deadbolt picks up exactly where this process ends.
Common Problems and How to Fix Them
Most removals go smoothly. But a handful of situations come up repeatedly — knowing how to handle them before you're staring at a stuck screw saves real frustration.
Stuck or Stripped Screws
- Painted-over screws — If the door has been repainted multiple times, screw heads may be filled with paint. Use a utility knife to score around the head and dig paint out of the slot before applying the screwdriver.
- Corroded screws — Apply a small amount of penetrating oil to the screw head, wait 10–15 minutes, then try again. Don't force a corroded screw — you risk rounding out the slot entirely.
- Stripped screw heads — Place a wide rubber band over the screw head for added grip and try again. If the slot is too far gone, use a screw extractor bit in a drill. This is a $10 tool at any hardware store and is the cleanest solution for a fully stripped head.
- Screws that simply won't break loose — Apply heat with a hair dryer for 30 seconds, then try immediately. The thermal expansion can break the rust bond enough to get them moving.
The Knob Won't Pull Off
- Set screw still partially engaged — Double-check that any set screw or spring-release tab is fully disengaged. These are easy to miss on the first pass, especially if the knob is dark-colored.
- Paint bond between rose plate and door — Score around the entire perimeter of the rose plate with a utility knife before pulling. This prevents paint chips and potential wood damage along the door face.
- Bound spindle — Wiggle both knobs simultaneously while pulling. Square spindles can get slightly cross-threaded or bent after years of use, creating friction that resists a straight pull.
- Wrong fastener type identified — Some knobs combine a set screw AND a cover plate. If your approach isn't working, step back and examine both sides of the door before assuming something is broken.
If the knob comes off cleanly but the latch mechanism sticks, doesn't spring back, or is misaligned with the strike plate, that's a separate repair worth handling before you install any replacement hardware. Putting a new knob onto a door with a faulty latch just delays the problem.
DIY Removal vs. Calling a Locksmith
For most door knob removals, this is squarely a DIY job. But there are real situations where a locksmith's time is worth the money — and knowing the difference saves you from a frustrating afternoon on the wrong track.
When DIY Makes Sense
- You're swapping a functioning or cosmetically worn knob for a new one on any interior door.
- The door is a bedroom, bathroom, or closet — where security isn't the primary concern and a mistake is low-stakes.
- You have basic tools, 20–30 minutes, and you're comfortable troubleshooting if something doesn't release cleanly.
- The knob is a standard visible-screw or common hidden-fastener design that you can identify before starting.
- You're doing this as part of a broader security upgrade — removing old hardware to install a smart lock or deadbolt you've already selected.
When to Call a Professional
- It's an exterior door and you're stuck — If you can't determine the fastener type on your primary entry door and you're at risk of being locked out, a locksmith is the safe call.
- There are signs of forced entry — If the knob was forced at some point, internal damage to the door or jamb may not be obvious until you're mid-removal. A locksmith can assess what you're actually dealing with.
- The bore hole or door frame is damaged — This moves from lock replacement into carpentry territory. Proper repair of a damaged door edge or frame needs different skills and tools.
- You're integrating with an alarm or access control system — Complex installations that need to communicate with other security hardware benefit from professional setup to ensure compatibility and correct operation.
A straightforward interior knob swap is a Saturday morning project. An exterior door that hasn't had its hardware changed in 20 years, showing rust around the latch or a rose plate that's clearly been painted over multiple times? Consider a quick call first to understand what you're walking into.
Frequently Asked Questions
How do I identify which type of door knob I have before I start?
Look at the rose plate — the flat disc where the knob meets the door face. If you see screw heads, it's a visible-screw type. If the surface is completely smooth, look along the shank of the interior knob for a small pinhole, a slot, or a recessed hex screw. If you see a decorative ring that can be pried away, you have a cover-plate style. Most modern residential knobs fall into the hidden-fastener category.
Do I need to take the door off its hinges to remove the knob?
No — and you shouldn't. You can remove a door knob with the door fully in place. Having it slightly ajar actually makes the job easier, since you can access both the door face and the edge without the door shifting. Removing it from the hinges adds unnecessary work and creates new problems if the door is heavy or the frame is snug.
Can I remove a door knob from the outside if it's locked?
It depends on the knob type. For interior privacy knobs (bathroom or bedroom locks), there's typically an emergency release slot in the center of the outer knob — a coin or small flathead can turn it. For keyed exterior knobs, full removal from the outside requires access to the interior mounting screws, which means the door generally needs to be open or unlocked first. If you're locked out, a locksmith is the right call rather than attempting to force the hardware.
What happens if I strip a screw while removing the knob?
Stop turning immediately — continuing will only deepen the damage. Try placing a wide rubber band over the screw head and pressing your screwdriver firmly into it; the added grip often gets things moving. If the head is too far gone, a screw extractor bit (available at any hardware store for under $15) is the cleanest fix. For a field solution, a rotary tool can cut a new flathead slot into the damaged head so you can back it out.
Will removing a door knob damage the door?
Not if you work carefully. The most common damage is cosmetic — scratched finish or chipped paint around the rose plate during removal. To prevent this, apply masking tape around the plate perimeter before you start, score any paint seal with a utility knife, and avoid leveraging against the door surface when prying. Forcing a component that won't move freely is the fastest way to cause actual wood damage.
How long does it typically take to remove a door knob?
A standard removal on a knob you've correctly identified takes 10 to 20 minutes from start to finish. If you run into stuck screws, paint buildup, or need to troubleshoot an unfamiliar fastener system, budget up to 45 minutes. Having the correct tools — especially the right Allen wrench size — before you begin is the single biggest factor in keeping the job short.
Every home security upgrade starts at the door — and knowing how to remove a door knob is the first step toward putting better hardware in its place.


About Vincent Foster
Greetings, This is Tom Vincent. I’m a home Security Expert and Web developer. I am a fan of technology, home security, entrepreneurship, and DIY. I’m also interested in web development and gardening. I always try to share my experience with my reader. Stay Connected and Keep Reading My Blog. Follow Me: Facebook, Twitter, Pinterest
Now you can get FREE Gifts. Or latest Free Security Cameras here.
Disable Ad block to reveal all the gifts. Once done, hit a button below