My old apartment had a deadbolt that wobbled every time you turned the key. The previous tenant had installed it crooked, with screws stripped and a strike plate that barely caught. One good shove and it would have given way. Learning how to install a deadbolt lock the right way — not just sort of installed, but properly secured — is one of the most valuable things you can do for your home's safety. A solid door lock is your first real barrier against forced entry, and getting it wrong defeats the whole purpose.
The good news: installing a deadbolt is a realistic DIY project for most homeowners. You don't need a locksmith, you don't need specialized training, and you can finish in under an hour with tools you probably already own. What you do need is a clear process and the knowledge to avoid the mistakes that make a deadbolt look installed without actually being secure.
This guide walks you through everything — choosing the right lock, drilling correctly, anchoring the strike plate, and troubleshooting when something doesn't go as planned. By the end, you'll know exactly what a proper installation feels and looks like.
Contents
Everything You Need Before You Start
The Basic Tools
You don't need a full workshop. Here's what actually gets used during a deadbolt installation:
- Power drill with a 2-1/8" hole saw (for the main lock body hole through the door face)
- 1" spade bit or chisel bit (for the bolt hole through the door edge)
- Wood chisel and hammer (to mortise the faceplate flush with the door edge)
- Tape measure and pencil
- Phillips and flathead screwdrivers
- A door lock installation kit (optional, but the built-in guide makes centering effortless)
Pro tip: A door lock installation kit costs about $15 at any hardware store and includes hole saws plus a self-centering guide — it eliminates the most common drilling errors in one tool.
Choosing the Right Deadbolt
Before you buy, you need two measurements: your door's backset (the distance from the door edge to the center of the existing lock hole — either 2-3/8" or 2-3/4") and its thickness (most exterior doors run 1-3/8" to 1-3/4"). Getting the wrong backset means the bolt won't line up with the strike plate, and no amount of adjustment fixes that.
According to Wikipedia's overview of deadbolts, an ANSI Grade 1 deadbolt must withstand at least 10 forced-entry attempts, making it the industry benchmark for residential security. For most front doors, that's exactly what you want.
| Deadbolt Type | Security Level | Best For | Typical Price |
|---|---|---|---|
| Single cylinder | High (ANSI Grade 1) | Standard exterior doors | $25–$80 |
| Double cylinder | Very high | Doors with adjacent glass panels | $40–$120 |
| Keypad deadbolt | High, no physical key | Families, rental properties | $60–$200 |
| Smart deadbolt | High + remote access | Tech-oriented homeowners | $80–$300 |
For most homeowners, a single-cylinder Grade 1 deadbolt hits the sweet spot of security, cost, and ease of use. Double-cylinder locks require a key from both sides — useful near glass, but a fire-safety concern if someone needs to exit quickly.
How to Install a Deadbolt Lock: Step by Step
Marking and Drilling
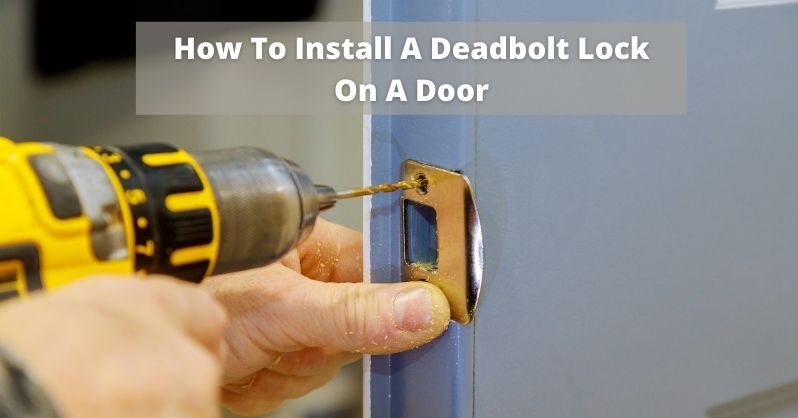
Every quality deadbolt comes with a paper template. Tape it to the door at the correct height — typically 6 to 12 inches above your existing knob — and mark both hole centers: one on the door face (for the lock body) and one on the door edge (for the latch bolt).
- Drill the face hole first using your 2-1/8" hole saw — stop when the pilot bit pokes through, then finish from the other side to prevent splintering
- Drill the edge hole with a 1" spade bit, keeping the drill level and perpendicular to the edge
- The two holes must intersect cleanly — check alignment before chiseling anything
Warning: Always drill the face hole before the edge hole. Drilling the edge first weakens the wood and can cause the face hole to blow out unevenly when you drill through.
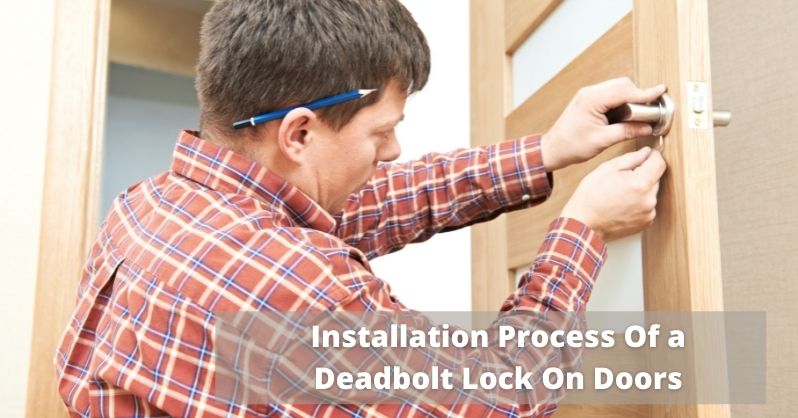
Installing the Lock Body
Slide the latch bolt assembly into the edge hole. The angled face of the bolt should point toward the door frame — that's what lets the door latch smoothly when you close it. Trace the faceplate outline onto the door edge, then use your chisel to cut a shallow mortise (recess) so the plate sits perfectly flush with the wood surface. Secure it with the provided screws.
Next, insert the exterior cylinder through the face hole, thread the interior thumb-turn onto the connecting spindle, and hand-tighten the mounting screws. Alternate between screws as you tighten — this keeps the cylinder centered. Stop when snug. Overtightening binds the mechanism and makes the key stiff to turn.
Installing the Strike Plate
Close the door and extend the bolt by hand to mark where it contacts the frame. Chisel out a recess for the strike plate so it sits flush with the jamb surface. Now here's the step most people skip: replace the short screws that come with the plate. Use 3-inch #8 wood screws that reach past the jamb and into the structural stud behind it. Short screws only grip the thin jamb wood — one solid kick defeats them. Long screws reach solid framing and hold.
What a Real Installation Looks Like in Practice
Standard Door Setup
On a typical 1-3/4" solid wood exterior door, a full installation from template to test takes around 45 minutes. When it's done right, the bolt extends with a satisfying click, the key turns without effort, and there's no wobble or play in the cylinder. The door closes flush, latches cleanly, and the faceplate is invisible against the edge.
If you've ever tackled a project like installing a door handle set, you'll find the deadbolt process very familiar. The drilling steps are nearly identical, and the same patience with chiseling the faceplate mortise pays off here just as much.
Solid Core vs. Hollow Core Doors
Hollow core doors offer almost no security, regardless of the lock you put on them. The wood surrounding the lock is thin and will fail quickly under force. If you knock on your door and it sounds empty, you have a hollow core door — common on interior doors and some apartment entry doors.
For any exterior door, solid core or solid wood construction is non-negotiable. The deadbolt is only as strong as the door it's mounted in. A Grade 1 lock on a hollow door is a false sense of security.
DIY vs. Hiring a Pro: Which Route Is Right for You?
When to Go the DIY Route
DIY makes sense when the conditions are straightforward. You're in good shape to handle this yourself if:
- You're replacing an existing deadbolt in the same location — no new drilling required
- Your door is standard thickness, solid wood or solid core, and in good condition
- You have a drill and basic hand tools
- You're installing a standard single-cylinder lock, not a wired smart lock
A direct replacement takes 20–30 minutes and saves $50–$150 in labor. If you want to upgrade to a smart lock after this, the guide on how to install a smart lock walks through that process with the same level of detail.
When to Call a Locksmith
Some situations genuinely call for a professional. Hand it off to a locksmith when:
- You're drilling a new hole into a steel or fiberglass door
- The door frame is damaged, rotted, or out of square
- A previous forced entry warped the jamb and the frame needs structural repair first
- Your insurance policy specifies certified installation for coverage purposes
Pro insight: A locksmith's real value isn't just installing the hardware — it's spotting vulnerabilities in the door, frame, and surrounding area that you'd likely miss on your own.
Mistakes That Undermine Your Security
Getting the Backset Wrong
Buying a deadbolt with the wrong backset is the most common and most avoidable installation error. If your door uses a 2-3/4" backset and you buy a 2-3/8" lock, the bolt won't align with the strike plate — and no adjustment fixes a structural mismatch. Measure your existing hole before leaving the hardware store. It's a 30-second check that saves a return trip.
Using the Included Screws on the Strike Plate
The screws packaged with most strike plates are 3/4" long. They grip only the thin door jamb, which can split under a single hard kick. This is a known weakness. Swap them immediately for 3-inch screws that anchor into the stud behind the jamb. This one upgrade costs nothing extra and dramatically improves kick-in resistance — it's arguably the most impactful step in the entire installation.
Ignoring Bolt Travel Problems
If the bolt doesn't extend and retract smoothly, the lock is stressed every time you use it. Worn mechanisms eventually fail to extend fully — and a bolt that's 80% extended offers a fraction of the security of one that's fully thrown. Test the bolt travel before finishing. It should move with light, consistent pressure. Any stiffness or partial travel means something needs adjustment before you're done.
Fixing Problems After Installation
Bolt Won't Extend Fully
Work through these checks in order:
- Latch hole depth: The edge hole needs a clean 1" of depth — measure and redrill if it's shallow
- Strike plate alignment: Coat the bolt tip with a dry-erase marker or lipstick, close the door, and check where it contacts the plate. The mark shows you exactly what's misaligned.
- Overtightened mounting screws: Back each screw off a quarter turn, then test again. Even slight overtightening can bow the cylinder housing and bind the mechanism.
Door Won't Close After Installation
If the door suddenly drags or won't latch after installing the deadbolt, the new hardware is likely protruding. Check these spots:
- The latch faceplate on the door edge — it must be flush, not raised
- The exterior cylinder flange — if it sticks out even 1/16", it can prevent a full close
- The strike plate mortise in the frame — deepen it in small increments until the plate sits flush
Fix these issues with a chisel, removing wood gradually. Rushing the chisel is what causes uneven recesses in the first place — take your time and test the door after every small pass.
Frequently Asked Questions
Do I need a professional to install a deadbolt lock?
For most standard exterior doors, no. If you're replacing an existing deadbolt or installing one in a pre-drilled door, this is a manageable DIY project that takes under an hour. You need professional help when the door is steel, fiberglass, structurally damaged, or when frame repair is required first.
How long does it take to install a deadbolt lock?
A direct replacement on an existing hole takes 20–30 minutes. A fresh installation that requires drilling both holes, chiseling mortises, and installing the strike plate from scratch typically takes 45–60 minutes. First-timers should budget a little extra for measuring and checking alignment.
What size hole saw do I need to install a deadbolt?
The standard cross-bore hole through the door face is 2-1/8" in diameter. The bolt hole through the door edge is typically 1" in diameter. Most deadbolt installation kits include both sizes along with a centering guide.
What is a backset on a deadbolt lock?
The backset is the distance from the edge of the door to the center of the lock hole. Residential doors use either a 2-3/8" or 2-3/4" backset. You must match this measurement when buying a new deadbolt, or the bolt won't align with the strike plate in the door frame.
Can I install a deadbolt on a hollow core door?
Technically yes, but it provides very little security. Hollow core doors don't have enough structural material around the lock to resist forced entry. For any door where security matters — especially exterior doors — always use solid core or solid wood construction.
What screws should I use for the strike plate?
Replace the included screws with 3-inch #8 wood screws. The short screws that come with most strike plates only grip the thin door jamb. Three-inch screws reach through the jamb and anchor into the structural stud behind it, making the door dramatically more resistant to kick-in attacks.
How do I know if my deadbolt is installed correctly?
The bolt should extend and retract smoothly with consistent, light pressure. The key should turn without stiffness. The cylinder should have no wobble or play. The door should close and latch without dragging, and all faceplates should sit flush with the door and frame surfaces.
What's the difference between a single and double cylinder deadbolt?
A single cylinder deadbolt uses a key on the outside and a thumb-turn on the inside — the most common type for residential use. A double cylinder requires a key on both sides, which adds security near glass panels but creates a fire-safety risk if you can't find the key during an emergency. Check your local building codes before installing a double cylinder lock.
Key Takeaways
- Always match the backset measurement before buying a deadbolt — it's either 2-3/8" or 2-3/4", and there's no workaround if you get it wrong.
- Replace the strike plate's included screws with 3-inch wood screws that anchor into the structural stud — this single step delivers the biggest security improvement of the entire installation.
- Only install deadbolts on solid core or solid wood exterior doors — hollow core doors cannot provide meaningful security regardless of lock grade.
- Test bolt travel, key operation, and door closure before calling the job done — a properly installed deadbolt works smoothly with zero wobble, drag, or stiffness.


About Vincent Foster
Greetings, This is Tom Vincent. I’m a home Security Expert and Web developer. I am a fan of technology, home security, entrepreneurship, and DIY. I’m also interested in web development and gardening. I always try to share my experience with my reader. Stay Connected and Keep Reading My Blog. Follow Me: Facebook, Twitter, Pinterest
Now you can get FREE Gifts. Or latest Free Security Cameras here.
Disable Ad block to reveal all the gifts. Once done, hit a button below