You can learn how to wire a doorbell in about 30 minutes with basic tools. The process connects three components — a transformer, a push button, and a chime — using thin, low-voltage wire. If you want to understand the full system before you pick up a screwdriver, read our guide on how a doorbell works. This guide covers the wiring steps, pro tips, a wired vs. wireless comparison, and how to fix common problems.
Most homes already have doorbell wiring tucked inside the walls. You might be replacing a worn-out button, upgrading to a better doorbell chime, or starting fresh from scratch. Either way, the fundamentals stay the same. Doorbell circuits run on low voltage — typically 16 to 24 volts — which makes them far safer to work with than standard 120-volt household wiring.
Still, low voltage does not mean zero risk. The transformer that powers your doorbell connects directly to your home's main electrical system, and that side carries full household current. Always switch off the correct breaker before you touch the transformer. Use a non-contact voltage tester (a pen-shaped device that beeps near live current — available for under $20 at any hardware store) to confirm the power is off. This is a home improvement project you can handle yourself, but only if you respect the steps.
Contents
How to Wire a Doorbell: Step-by-Step for Any Home Setup
Every doorbell wiring job follows the same circuit path. Power leaves the transformer, travels to the chime, then runs out to the button. When you press the button, the circuit closes and the chime fires. According to Wikipedia, most residential doorbells use an electromagnetic coil or digital sound module at the chime unit. Understanding that path makes the wiring steps much easier to follow.
Tools and Materials You'll Need
Gather everything before you start. Stopping mid-job for a hardware run wastes time and increases the chance of an error.
- 18-gauge, two-conductor doorbell wire — two wires inside a single jacket
- Flathead and Phillips screwdrivers
- Wire stripper
- Non-contact voltage tester
- Drill and bits (only needed if running new wire through walls)
- Fish tape or fish sticks (for pulling wire through finished walls)
- Needle-nose pliers
- Electrical tape
If you're replacing an old system, check whether the existing wire is still intact before pulling new wire. Reusing old wire that's in good condition can save you hours of fishing through walls.
The Wiring Process, Explained
Follow these steps in order. Do not skip the power-off step — even briefly.
- Turn off power at the breaker. Find the circuit feeding your transformer — often labeled "doorbell," "HVAC," or "misc." Flip it off. Confirm with your voltage tester before you touch anything.
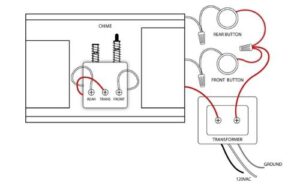
- Locate your transformer. It's usually mounted near the main electrical panel, in a utility closet, or near the furnace. It steps your home's 120V down to a safe 16–24V output.
- Connect wire to the transformer. Two low-voltage output terminals accept your doorbell wire. Attach one wire to each terminal. Polarity doesn't matter on AC doorbell circuits.
- Run wire to the chime. Route the wire from the transformer location to wherever your chime unit will sit — typically in a hallway or near the front door on the inside wall.
- Connect wire at the chime. Chime units have labeled terminals: usually "Trans" (transformer), "Front" (front button), and sometimes "Rear" (second button). Connect each wire to the correct terminal.
- Run wire from the chime to the button. Route a second length of wire from the chime's "Front" terminal out to your front door button location.
- Connect wire to the button. Strip about half an inch from each wire end. Wrap each wire clockwise around a button terminal screw and tighten firmly.
- Restore power and test. Turn the breaker back on and press the button. A working chime means you're done.
Pro tip: Before disconnecting an old system, label each wire with a small piece of masking tape. It removes all guesswork when connecting the new components.
Pro Tips for Getting the Wiring Right
Knowing how to wire a doorbell correctly is one thing. Building a neat, lasting installation is another. These tips apply whether you're doing this for the first time or the fifth.
Safety First
- Never assume a transformer is off just because the doorbell doesn't ring. Always test with a voltage tester.
- The transformer's input side carries full 120V. Do not touch those terminals, even with the doorbell circuit switched off at the breaker.
- In older homes, inspect existing wire carefully. Brittle or cracked insulation means the wire should be replaced, not spliced.
- If your transformer is mounted directly on a breaker panel box and you're not comfortable around live panels, call a licensed electrician for that step only.
Warning: A transformer mounted on a main junction box may still have live terminals adjacent to it even after you cut the doorbell breaker. Treat the surrounding area as live until you verify otherwise.
Making the Connection Last
Loose connections are the most common reason doorbells fail months after installation. Wrap each wire clockwise around the terminal screw — that way, tightening the screw pulls the wire in rather than pushing it out. After tightening, tug each wire firmly to confirm it holds.
When running wire through an exterior wall, seal any entry points with weatherproof caulk. Moisture attacks wire contacts over time. If you're also updating your door hardware at the same time, our walkthrough on installing a Kwikset front door handle set covers how to work cleanly around door frames without damaging anything.
Choose an outdoor-rated button housing. The push button at your front door takes constant weather exposure. Make sure the housing is rated for outdoor use and that the wire entry point is either sealed or protected with a rubber grommet.
Wired vs. Wireless Doorbells: Weighing Both Sides
Before committing to a full wiring job, it helps to know what you're trading off against a wireless option. Neither is universally better. Your home's setup and your priorities should drive the decision.
Where Wired Wins
A wired doorbell draws constant power from the transformer. You never deal with dead batteries or replacing a receiver unit. That reliability matters in high-traffic homes where the button gets pressed many times each day.
Wired systems also support better chime options. If you want a loud, clear, musical tone that fills the house, a wired chime unit gives you far more variety than most wireless models. And if you ever upgrade to a video doorbell, most video models are built to run on existing wired doorbell circuits — so the work you do today carries forward.
Where Wireless Makes More Sense
Wireless doorbells are the right call when there's no existing wiring. No drilling through walls, no fish tape, no transformer installation. Plug in the receiver, mount the button by the door, and you're done in fifteen minutes.
| Feature | Wired Doorbell | Wireless Doorbell |
|---|---|---|
| Installation difficulty | Moderate — requires wiring | Easy — plug and mount |
| Power source | Transformer (always on) | Batteries (need replacement) |
| Reliability | High — no signal loss | Good — occasional interference |
| Chime sound quality | Usually better and louder | Variable by model |
| Video doorbell compatible | Yes — most video models use existing wiring | Yes — battery-powered video models available |
| Best for | Existing wiring, permanent installs | Rentals, no-wire situations |
| Typical cost | $30–$100+ | $20–$80 |
If long-term reliability is your priority and you have wiring already in place, the wired route wins. If you're renting or want the fastest possible install, wireless is a perfectly reasonable choice.
Solving Common Doorbell Wiring Problems
Even a careful wiring job can produce unexpected results. Here are the three problems homeowners run into most often — and how to work through each one.
No Sound at All
Start at the transformer. Use your voltage tester on the output terminals. You should see 16–24 volts. A reading of zero means the transformer has failed and needs replacement — they typically cost $15–$30 at a hardware store and take about ten minutes to swap out.
If the transformer tests fine, move to the chime. Loose wires at the "Trans" or "Front" terminals are the most common culprit. Re-strip the ends to expose fresh wire and retighten both terminal screws. Also check the button itself — corroded or loose button contacts are a frequent cause of silence that often gets overlooked.
Buzzing or Humming Chime
A chime that buzzes without ringing properly means the button contacts are sticking. The button is designed to touch briefly and spring apart. When the contacts stay closed, current flows continuously to the chime coil and produces a hum instead of a ring.
Remove the button and inspect the contacts. Clean them with fine sandpaper or a small wire brush. If the internal spring is broken, replace the button — they cost under $10. Fix this quickly, because continuous current flow can overheat and burn out your transformer over time.
Doorbell Rings on Its Own
A doorbell that rings without anyone pressing it almost always points to a short in the wire run between the button and the chime. Walk the entire wire path and look for spots where insulation is worn through or two conductors are touching. It can also happen when the button wires make contact with each other at the terminal — separate them and wrap each wire individually with electrical tape.
In rare cases, electromagnetic interference from nearby cables can trigger a doorbell. That's unusual, but if you've ruled out shorts and contact issues, re-routing the doorbell wire away from high-voltage cables can help.
Frequently Asked Questions
Can I wire a doorbell without a transformer?
No. The transformer is a required component — it steps household voltage down to the safe low-voltage level that doorbell circuits use. Without it, the button and chime won't function correctly, and connecting them directly to household current would damage the components and create a fire hazard.
What gauge wire should I use for doorbell wiring?
Use 18-gauge, two-conductor doorbell wire. It's the standard size for residential doorbell circuits and handles the low-voltage current reliably over long runs. Avoid substituting speaker wire or other types — they may not perform consistently under daily use.
How do I know if my doorbell transformer is bad?
Test the output terminals with a non-contact voltage tester or a multimeter. A healthy transformer should read between 16 and 24 volts AC. A reading of zero volts means the transformer has failed and needs to be replaced before the rest of the system will work.
Is it safe to wire a doorbell yourself?
Yes, for the low-voltage portions of the job. The doorbell circuit itself is safe to handle once the breaker is off. The one exception is the transformer's input side, which is wired to full 120V household current. If you're not comfortable working near your electrical panel, have a licensed electrician handle only that connection.
Can I reuse old doorbell wiring for a video doorbell?
In most cases, yes. The majority of wired video doorbells are designed to use existing two-conductor doorbell wire and a compatible transformer. Check the video doorbell's specifications — most require a transformer rated at 16–24V AC. If your current transformer meets that range and the wire is in good condition, you can reuse both without any modifications.
Wire it right once and your doorbell will be the last thing at your front door that ever gives you trouble.


About Vincent Foster
Greetings, This is Tom Vincent. I’m a home Security Expert and Web developer. I am a fan of technology, home security, entrepreneurship, and DIY. I’m also interested in web development and gardening. I always try to share my experience with my reader. Stay Connected and Keep Reading My Blog. Follow Me: Facebook, Twitter, Pinterest
Now you can get FREE Gifts. Or latest Free Security Cameras here.
Disable Ad block to reveal all the gifts. Once done, hit a button below